Byt ut eller ändra ett ansikte på ett foto, steg för steg
För att sätta ett ansikte på en annan bild behöver du två bilder: bilden du vill ändra och ett tydligt foto av ansiktet du vill lägga till. Matcha först vinkel, belysning och upplösning, gör ett test i fotoarbetsytan och åtgärda sedan det du ser, en variabel i taget.
Av DeepSwapAI ProduktteamGranskad 5 oktober 2026Praktisk guide
Direkt svar
Så fungerar det att sätta ett ansikte på en annan bild
Oavsett om du kallar det att sätta in, infoga, ersätta, ändra eller byta ett ansikte är fotouppgiften densamma: en bild står för scenen och ett andra foto står för ansiktet.
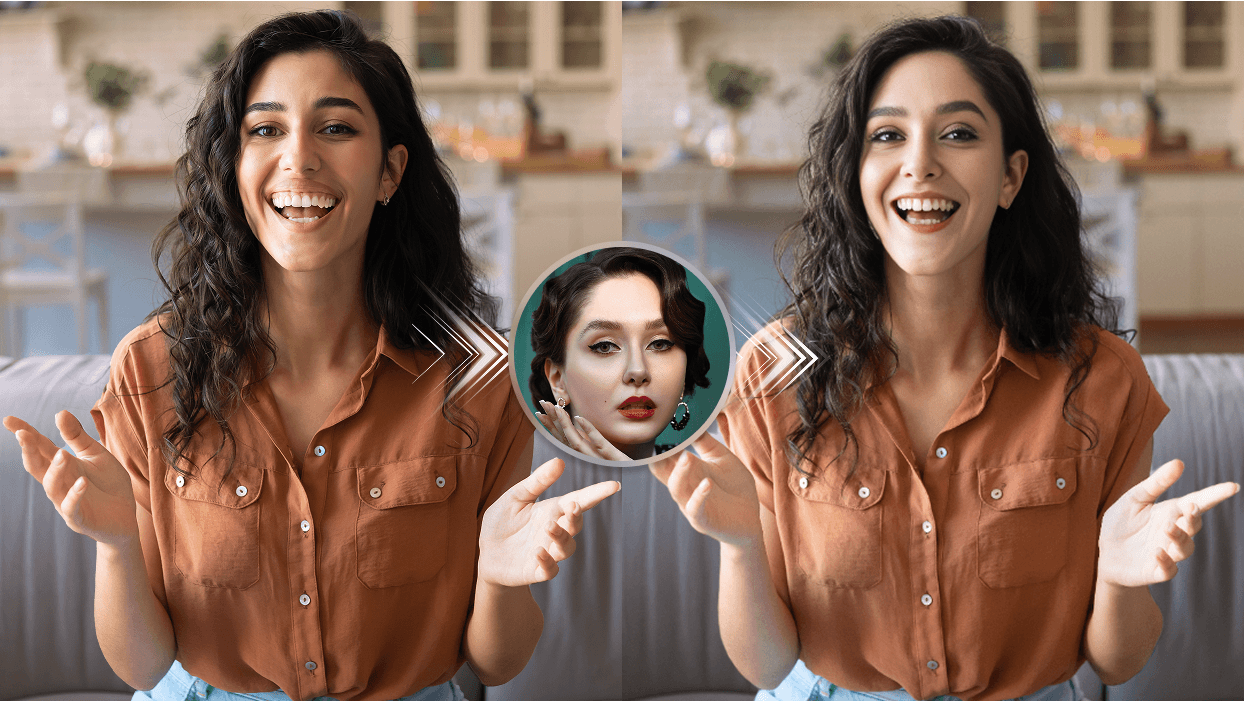
I DeepSwapAI:s fotoarbetsyta lägger du bilden du vill ändra i Källfoto och fotot av ansiktet du vill lägga till i Målansikte.
Det är ingen femtio-femtio-blandning. Källfoto behåller kropp, hår, pose, kläder, ljus, bildutsnitt och bakgrund, medan bilden i Målansikte ger ansiktets identitetsdrag. Därför behöver de två fotona stämma överens i vinkel, belysning och detalj innan du genererar.
Innan du genererar: kontrollera etiketterna ovanför båda förhandsvisningarna. Om scenbilden visas under Målansikte, eller identitetsporträttet under Källfoto, byt tillbaka dem.
Officiellt illustrativt arbetsflödesexempel. Källfoto tillhandahåller scenen; Målansikte tillhandahåller identitetsledtrådar. Denna sammansättning är inte ett kundresultat, en live-uppgiftsjournal eller en kontrollerad kvalitetsriktmärke.
Femstegs fotoredigeringsarbetsflöde
Sätt ett ansikte på en annan bild i fem steg
Behandla inte de två uppladdningarna som utbytbara. Källfoto är scenen du vill redigera. Målansikte är ett separat porträtt vars synliga ansiktslandmärken styr ersättningen.
Välj bilden du vill ändra som Källfoto. Använd ett foto som du får redigera. Källfoto behåller kropp, hår, pose, kläder, belysning och bakgrund, så välj ett där ansiktet är stort, skarpt och till största delen inte skymt.
Välj ett tydligt foto av ansiktet du vill lägga till som Målansikte. Använd ett skarpt, väl belyst och oskymt porträtt av personen vars ansikte du vill sätta på bilden. Målansikte ger identitetsdragen, så undvik gruppfoton, kraftiga filter och små ansikten.
Matcha vinkel, belysning och upplösning. Jämför huvudets vridning och lutning, ljusets riktning och färg och hur mycket ansiktsdetalj varje bild har. Åtgärda den största skillnaden innan du laddar upp, eftersom en närmare matchning oftast hjälper mer än ett nytt försök.
Ladda upp båda fotona och bekräfta kostnaden på 6 krediter. Lägg bilden som ska ändras i Källfoto och ansiktsfotot i Målansikte och bekräfta sedan båda förhandsvisningarna. Ett ansiktsbyte på foto kostar för närvarande 6 krediter. Före något slutfört kreditköp visar provbilden synligt DeepSwapAI.com och kontots 100% kompletta e-postadress. Varje tecken är synligt; adressen är inte maskerad, förkortad, hashad eller utelämnad. En provbild kan inte levereras utan den fullständiga e-postvattenstämpeln. Efter något slutfört engångskreditköp är framtida bildexporter vattenstämpelfria; befintliga provfiler ändras inte.
Generera, granska och åtgärda en variabel i taget. Kontrollera identitet, ansiktskanter, ljus, hår, ocklusion och scenkontinuitet. Om resultatet behöver en ny omgång, ändra en Källfoto- eller Målansikte-variabel så att jämförelsen förblir användbar.
Regel för endast bildexport: det fullständiga e-postuttalandet ovan gäller provbildexporter och beskriver inte GIF eller videovattenstämpelbeteende. Läs provbildens vattenstämpel- och betald-upplåsningsguide innan du genererar eller delar.
Välj de två fotona
Välj bilden som ska ändras och ansiktsfotot var för sig
De flesta nedslående resultat börjar med fel fotopar. Välj varje bild för sin egen uppgift och bestäm vilket ansikte du ska använda först när du har kontrollerat att vinklarna ungefär stämmer.
Bilden du vill ändra (Källfoto)
Välj en bild där ansiktet som ska bytas ut syns tydligt, är ganska stort i bilden och inte täcks av händer, hår, solglasögon eller munskydd. Allt utom ansiktet förblir som det är, så kläder, kropp, hår och bakgrund bör redan se ut som du vill.
Ansiktet du vill lägga till (Målansikte)
Välj ett enda skarpt porträtt med jämnt ljus där båda ögonen syns. Ett foto taget från ungefär samma håll som ansiktet i bilden fungerar bättre än ett perfekt studioporträtt från en helt annan vinkel.
Foton att undvika
Undvik selfies med kraftiga filter, skärmbilder av skärmbilder, små ansikten utklippta ur en folkmassa och bilder där ansiktet ligger i djup skugga. Att förstora ett litet ansikte återskapar inte de detaljer som saknas.
Matcha vinkel, ljus och upplösning
Åtgärda konflikterna med högst påverkan först
Börja med identitetssynlighet och pose. Fin textur kan inte kompensera för ett ansikte som är för litet, suddigt, dolt eller vänt åt ett helt annat håll. Den aktuella fotoytan accepterar JPEG, PNG och WebP bilder upp till 30 MB.
Variabel
Föredra
Undvik
Varför det spelar roll
Identitetsreferens
Ett skarpt, väl upplyst, oskymt ansikte
Gruppbilder, tunga filter, små ansikten
Tydliga landmärken minskar identitetstvetydighet.
Pose
En liknande gir och huvudlutning som målet
Framåtvänd referens för en extrem profil
Stora vinkelkonflikter kan förvränga ansiktsstrukturen.
Uttryck
Ett neutralt eller målliknande uttryck
Slutna ögon eller överdrivet uttryck om inte nödvändigt
Mun- och ögongeometri påverkar den upplevda matchningen.
Ett ansikte med tillräckligt många pixlar för att inspekteras i normal storlek
Uppskalade miniatyrer eller komprimeringsartefakter
Uppskalning återskapar inte saknad identitetsdetalj.
Vinkel: om personen på bilden tittar över ena axeln, använd ett ansiktsfoto som är vridet åt samma håll i stället för ett porträtt rakt framifrån.
Belysning: notera vilken sida av ansiktet som är ljusast på varje foto. Ljus från motsatta håll är den vanligaste orsaken till att ett nytt ansikte ser påklistrat ut.
Upplösning: ansiktsfotot bör visa minst lika mycket ansiktsdetalj som ansiktet du byter ut. Zooma in båda till samma storlek och jämför ögonen.
Snabbaste användbara testet: använd ett Målansikte som matchar Källfotots pose och ett som är mer framåtvänt. Jämför ögon, mun, käklinje och scenkontinuitet istället för att bara bedöma övergripande likhet.
Använd fotoarbetsytan
Byt ut ett ansikte på ett foto med DeepSwapAI
Öppna fotoarbetsytan. Den finns på DeepSwapAI:s startsida, med separata uppladdningsfält för Källfoto och Målansikte.
Ladda upp bilden du vill ändra till Källfoto. Vänta på förhandsvisningen och kontrollera att hela scenen syns.
Ladda upp ansiktsfotot till Målansikte. Kontrollera att förhandsvisningen visar ett tydligt ansikte.
Kontrollera kostnaden och starta bytet. Varje genererat foto kostar 6 krediter, och arbetsytan visar beloppet innan du skickar.
Granska resultatet. Jämför det med båda originalen i normal visningsstorlek innan du sparar eller delar det.
Använd en närmare, skarpare referens med färre filter. Se till att ansiktet upptar tillräckligt med bilden för att visa ögon-, näs-, mun- och käkdetaljer.
Ansiktsformen ser instabil ut
Minska vinkelskillnaden mellan referens och mål. Extrema profiler och branta huvudlutningar är svårare än närmatchande poser.
Hudton eller belysning ser inklistrad ut
Välj ett mål med jämnare ansiktsbelysning eller en referens utan starkt färgat ljus. Bevara målscenen som belysningskällans sanning.
Hår eller glasögon ser fel ut
Hår och accessoarer tillhör målscenen. Välj ett mål där de inte döljer kritiska landmärken, och inspektera kantövergångar i normal visningsstorlek.
Uttrycket känns onaturligt
Använd en referens med kompatibelt mun- och ögontillstånd. Om måluttrycket är extremt, testa ett närmare uttryck innan du ändrar andra variabler.
Uppladdningen misslyckas eller inget ansikte hittas
Kontrollera först filtyp och filstorlek och se sedan till att ansiktet är stort och inte skymt. Vid uppladdningsfel, fastnade uppgifter och misslyckade resultat följer du felsökningsguiden.
Resultatet ändras mellan bildrutor
Move till videoguide eller GIF-guide och inspektera rörelseoskärpa, vändningar, ocklusion, ljusförändringar och slingfogar bildruta för bildruta.
Be om tillstånd innan du sätter någons ansikte på en bild
Fråga först: använd ditt eget ansikte, eller ett ansikte vars ägare har godkänt just den här redigeringen.
Respektera bildens ägare: redigera bara foton som du har tagit, äger eller har tillstånd att ändra.
Vilseled inte: presentera inte ett ändrat foto som en verklig händelse, använd det inte för att utge dig för att vara någon annan och dela det inte för att förödmjuka eller trakassera någon.
Märk redigeringar när det spelar roll: ange att bilden är redigerad när betraktare rimligen kan ta den för ett oredigerat foto.
Ladda upp bilden du vill ändra som Källfoto och ett tydligt, jämnt belyst foto av ditt ansikte som Målansikte, med en huvudvinkel som liknar personen på bilden. Bekräfta kostnaden på 6 krediter, generera och kontrollera ögon, mun, käke och kanter innan du delar.
Vilken bild går i Källfoto?
Källfoto är den huvudsakliga scenbilden du vill redigera. Dess kropp, hår, pose, kläder, belysning, inramning och bakgrund ger det visuella sammanhanget för resultatet.
Vilken bild går i Målansikte?
Målansikte är det separata identitetsreferensporträttet. Använd ett tydligt, oskymt ansikte med en vinkel och ett uttryck som är rimligt nära personen i Källfoto.
Kan jag sätta ett ansikte på en annan kropp?
Ja. Fotoarbetsflödet byter bara ut ansiktet, så kropp, hår, kläder och bakgrund kommer alla från Källfoto. Välj en bild vars huvudvinkel, hudbelysning och bildutsnitt passar ansiktsfotot, eftersom huvudform och hår inte överförs.
Kan jag byta ansikte på två personer som redan finns i samma foto?
Använd Flera ansiktsbyten för ett gruppfoto. Det upptäcker personerna i en bild och låter dig mappa en separat identitetsreferens till varje valt ansikte. Standardfotoarbetsflödet är för en scenbild plus en identitetsreferens.
Vad kostar det att byta ut ett ansikte på ett foto?
Det aktuella fotoarbetsflödet kostar 6 krediter per genererat resultat. Arbetsytan visar det slutliga kreditbeloppet före inlämning.
Behöver jag tillstånd för att sätta någon annans ansikte på en bild?
Ja. Använd bara ett ansikte du får använda och en bild du får redigera, och dela inte ett resultat som kan vilseleda folk om vad någon har sagt eller gjort. Checklistan för integritet och samtycke visar vad du ska bekräfta först.
Registrera granskningen
Använd en bedömningsmall istället för att ändra standarden efter varje resultat
Den kostnadsfria kvalitetskortet för ansiktsbyte omvandlar de synliga kontrollerna ovan till sju dokumenterade kriterier för foton, videor och GIF. Den beräknar lokalt, exporterar JSON eller CSV, och håller samtycke, identitetsmappning och upplysning som kritiska grindar som en numerisk poäng inte kan åsidosätta.
Produktarbetsflödesbevis, inte ett syntetiskt riktmärke
DeepSwapAI:s produktteam granskade de aktuella etiketterna Källfoto och Målansikte, uppladdningsordningen, godkända format, kostnaden på 6 krediter, exportregeln för testbilder och de synliga kvalitetsvariablerna och kopplade sedan dessa fakta till arbetsflödena för batch, gruppfoto, video, GIF och resultatbedömning. Den här guiden mäter inte resultatkvalitet och lovar inte att en viss indata ger ett visst resultat. Den länkade bedömningsmallen är en öppen rubrik för mänsklig granskning, inte ett biometriskt mått eller en topplista över leverantörer. Produktfakta och gränser granskades den 5 oktober 2026; se verifieringsmetodik.
Nästa arbetsflödeskontroll
Fortsätt med guiden som passar ditt material
Gör ett genomtänkt fototest
Lägg bilden som ska ändras i Källfoto och ett passande ansiktsfoto i Målansikte, bekräfta kostnaden på 6 krediter och testvattenstämpeln med fullständig e-postadress och granska resultatet innan du skalar upp.