How to replace or change a face in a photo, step by step
To put a face on another picture you need two images: the picture you want to change and a clear photo of the face you want to add. Match the angle, lighting, and resolution first, run one test in the photo workspace, then fix what you see one variable at a time.
By DeepSwapAI Product TeamReviewed October 5, 2026Practical guide
Direct answer
How putting a face on another picture works
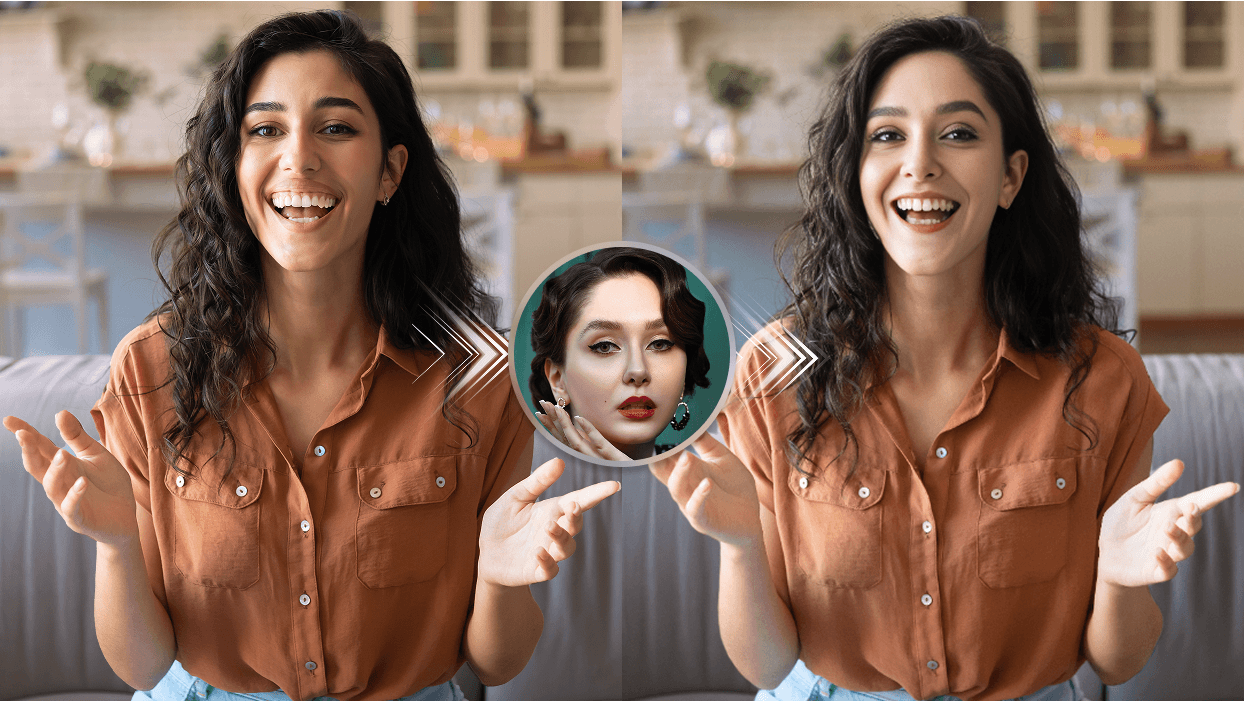
Whether you call it putting, inserting, replacing, changing, or switching a face, the photo task is the same: one picture provides the scene and a second photo provides the face.
In the DeepSwapAI photo workspace, the picture you want to change goes in Source Photo, and the photo of the face you want to add goes in Target Face.
It is not a fifty-fifty merge. Source Photo keeps the body, hair, pose, clothing, light, framing, and background, while the Target Face image supplies facial identity cues. That is why the two photos need to agree on angle, lighting, and detail before you generate.
Before you generate: check the labels above both previews. If the scene image appears under Target Face, or the identity portrait appears under Source Photo, swap them back.
Official illustrative workflow example. Source Photo supplies the scene; Target Face supplies identity cues. This composite is not a customer result, live-task record, or controlled quality benchmark.
Five-step photo workflow
Put a face on another picture in five steps
Do not treat the two uploads as interchangeable. Source Photo is the scene you want to edit. Target Face is a separate portrait whose visible facial landmarks guide the replacement.
Choose the picture you want to change as Source Photo. Use a photo you are allowed to edit. Source Photo keeps its body, hair, pose, clothing, lighting, and background, so pick one where the face is large, sharp, and mostly unobstructed.
Choose one clear photo of the face to add as Target Face. Use a sharp, well-lit, unobstructed portrait of the person whose face you want to put in the picture. Target Face supplies the identity cues, so avoid group shots, heavy filters, and tiny faces.
Match angle, lighting, and resolution. Compare head turn and tilt, light direction and color, and how much facial detail each image has. Fix the biggest mismatch before you upload, because a closer match usually helps more than a retry.
Upload both photos and confirm the 6-credit cost. Place the picture to change in Source Photo and the face photo in Target Face, then confirm both previews. A photo face swap currently costs 6 credits. Before any completed credit purchase, the trial image visibly displays DeepSwapAI.com and the account's 100% complete email address. Every character is visible; the address is not masked, shortened, hashed, or omitted. A trial image cannot be delivered without that complete-email watermark. After any completed one-time credit purchase, future image exports are watermark-free; existing trial files do not change.
Generate, inspect, and fix one variable at a time. Check identity, face edges, light, hair, occlusion, and scene continuity. If the result needs another pass, change one Source Photo or Target Face variable so the comparison stays useful.
Image-only export rule: the complete-email statement above applies to trial image exports and does not describe GIF or video watermark behavior. Read the trial image watermark and paid-unlock guide before generating or sharing.
Choose the two photos
Pick the picture to change and the face photo separately
Most disappointing results start with the wrong pair of photos. Choose each image for its own job, and leave the decision about which face to use until you have checked that the angles roughly agree.
The picture you want to change (Source Photo)
Pick a picture where the face you are replacing is clearly visible, reasonably large in the frame, and not covered by hands, hair, sunglasses, or a mask. Everything except the face stays as it is, so the clothing, body, hair, and background should already look the way you want.
The face you want to add (Target Face)
Pick a single, sharp portrait with even light and both eyes visible. A photo taken from roughly the same direction as the face in the picture works better than a perfect studio portrait at a very different angle.
Photos to avoid
Avoid heavily filtered selfies, screenshots of screenshots, tiny faces cropped from a crowd, and images where the face is in deep shadow. Upscaling a small face does not recreate the detail that is missing.
Match angle, light, and resolution
Fix the highest-impact conflicts first
Start with identity visibility and pose. Fine texture cannot compensate for a face that is too small, blurred, hidden, or facing a very different direction. The current photo workspace accepts JPEG, PNG, and WebP images up to 30 MB.
Variable
Prefer
Avoid
Why it matters
Identity reference
One sharp, well-lit, unobstructed face
Group shots, heavy filters, tiny faces
Clear landmarks reduce identity ambiguity.
Pose
A similar yaw and head tilt to the target
Front-facing reference for an extreme profile
Large angle conflicts can distort facial structure.
Expression
A neutral or target-like expression
Closed eyes or exaggerated expression unless required
Mouth and eye geometry affect the perceived match.
Lighting
Even light with visible facial detail
Crushed shadows, blown highlights, colored face light
The target scene still determines light and skin shading.
Occlusion
Eyes, nose, mouth, and jaw mostly visible
Hands, hair, glasses glare, masks, or objects covering landmarks
A face with enough pixels to inspect at normal size
Upscaled thumbnails or compression artifacts
Upscaling does not recreate missing identity detail.
Angle: if the person in the picture looks over one shoulder, use a face photo turned the same way rather than a straight-on portrait.
Lighting: note which side of the face is brighter in each photo. Light from opposite sides is the most common reason a new face looks pasted on.
Resolution: the face photo should show at least as much facial detail as the face you are replacing. Zoom both to the same size and compare the eyes.
Fastest useful test: use one Target Face that matches the Source Photo pose and one that is more frontal. Compare the eyes, mouth, jawline, and scene continuity rather than judging only overall resemblance.
Use the photo workspace
Replace a face in a photo with DeepSwapAI
Open the photo workspace. It is on the DeepSwapAI home page, with separate Source Photo and Target Face upload slots.
Upload the picture you want to change to Source Photo. Wait for the preview and confirm it shows the whole scene.
Upload the face photo to Target Face. Confirm the preview shows one clear face.
Check the cost and start the swap. Each generated photo costs 6 credits, and the workspace shows the amount before you submit.
Review the result. Compare it with both originals at normal viewing size before you save or share it.
Use a closer, sharper reference with fewer filters. Make sure the face occupies enough of the image to show eye, nose, mouth, and jaw detail.
The face shape looks unstable
Reduce the angle difference between reference and target. Extreme profiles and steep head tilts are harder than near-matching poses.
Skin tone or lighting looks pasted on
Choose a target with more even facial light or a reference without strong colored lighting. Preserve the target scene as the lighting source of truth.
Hair or glasses look wrong
Hair and accessories belong to the target scene. Select a target where they do not hide critical landmarks, and inspect edge transitions at normal viewing size.
Expression feels unnatural
Use a reference with a compatible mouth and eye state. If the target expression is extreme, test a closer expression before changing other variables.
The upload fails or no face is found
Check the file type and size first, then make sure the face is large and unobstructed. For upload errors, stuck tasks, and failed results, follow the troubleshooting guide.
The result changes across frames
Move to the video guide or GIF guide and inspect motion blur, turns, occlusion, lighting changes, and loop seams frame by frame.
Prefer to edit by hand? Layers, masks, and color matching give you pixel-level control. Follow the manual method in how to face swap in Photoshop.
Photo face questions
Answers before you upload
How do I put my face on another picture?
Upload the picture you want to change as Source Photo and a clear, evenly lit photo of your face as Target Face, with a head angle close to the person in the picture. Confirm the 6-credit cost, generate, and check the eyes, mouth, jaw, and edges before you share it.
Which image goes in Source Photo?
Source Photo is the main scene image you want to edit. Its body, hair, pose, clothing, lighting, framing, and background provide the visual context for the result.
Which image goes in Target Face?
Target Face is the separate identity-reference portrait. Use one clear, unobstructed face with an angle and expression reasonably close to the person in Source Photo.
Can I put a face on a different body?
Yes. The photo workflow replaces the face only, so the body, hair, clothing, and background all stay from Source Photo. Choose a picture whose head angle, skin lighting, and framing are compatible with the face photo, because head shape and hair are not transferred.
Can I swap two people who are already in the same photo?
Use Multiple Face Swap for a group photo. It detects the people in one image and lets you map a separate identity reference to each selected face. The standard photo workflow is for one scene image plus one identity reference.
How much does it cost to replace a face in a photo?
The current photo workflow costs 6 credits per generated result. The live workspace shows the final credit amount before submission.
Do I need permission to put someone else's face on a picture?
Yes. Only use a face you are allowed to use and a picture you are allowed to edit, and do not share a result that could mislead people about what someone said or did. The privacy and consent checklist covers what to confirm first.
Record the review
Use one rubric instead of changing the standard after every result
The free face swap quality scorecard converts the visible checks above into seven documented criteria for photos, videos, and GIFs. It calculates locally, exports JSON or CSV, and keeps consent, identity mapping, and disclosure as critical gates that a numerical score cannot override.
Product workflow evidence, not a synthetic benchmark
The DeepSwapAI Product Team reviewed the live Source Photo and Target Face labels, upload order, accepted formats, 6-credit cost, trial image export rule, and observable quality variables, then connected those facts to the batch, group-photo, video, GIF, and output-scorecard workflows. This guide does not measure output quality or promise that one input will produce a particular result. The linked scorecard is a transparent human-review rubric, not a biometric metric or provider leaderboard. Product facts and limits were reviewed on October 5, 2026; see the verification methodology.
Next workflow checks
Continue with the guide that matches your media
Run one deliberate photo test
Put the picture to change in Source Photo and a compatible face photo in Target Face, confirm the 6-credit cost and complete-email trial watermark, then inspect the result before scaling.